About the RBP framework
SAP SuccessFactors is a cloud-based Human Capital Management (HCM) suite that offers a range of modules for managing various HR functions. Data, security, and privacy are obviously quite important areas in HCM so it is essential to understand how SuccessFactors protects data through authorization and security within the system.
Role-based permissions Framework in SuccessFactors is the security framework that takes care of this. A System admin can assign specific rights and privileges to users based on their job responsibilities or roles within the organization. This helps control access to sensitive information and ensures that employees can only perform tasks relevant to their job functions.
Let’s first understand a few key aspects of role-based permissions in SAP SuccessFactors:
- Permission: This is the smallest entity of the RBP framework. Permission can provide access to the user in SuccessFactors, The access can be either for Employee Data like First Name, Date of Birth, etc. OR this can be for Admin functions like Hire an employee, Import/Export Data, etc.
- Permission Roles: A role contains permissions grouped together for a particular job role. For example: HR administrator role, Manager Role, Employee Self(ESS) Role, etc. Roles can be created and updated using the Manage Permission Roles page.
- Permission Groups: This is simply a group of users that can be used in the RBP framework to either Grant or Restrict access. Dynamic filters can be used to define these groups. There are 2 terms that are used a lot with permission groups “target” and “granted”(more on this later). Permission Groups can be created and updated using the Manage Permission Groups page.
Now let’s see how these aspects work together in the RBP framework. Take a look at the below diagram.

- Typically the first and most important step to grant access is to create a Role(Permission Role).
- Once the role is defined, you grant the role to groups of users represented by the Granted Users circle(Permission group).
- Lastly, you restrict the granted users to perform the role on the target users(Typically Permission Group).
How to Manage RBP
Prerequisite
In order to manage RBPs in SuccessFactors, A User first must be added to the “Manage Role-Based Permission Access” page list with edit access. Even if you have full access to the SuccessFactors system, you will not be able to access RBP configuration screens without this step. In a new SuccessFactors instance, the SFADMIN user will have this access by default.

Now that we have access to manage RBPs Let’s take an example requirement: “Create HR Manager role for the HR Department at NewYork city Office, The HRs should have access to view, edit employee Data & also hire new employees at the New York location.”
The Below diagram represents this requirement visually:

Create Permission Groups
To create Permission groups, login to SuccessFactors and search for “Manage Permission Groups” in the search bar. You can also navigate to Admin Centre>Tools>All and search for “Manage Permission Groups”. The Page looks like the below screenshot.

Click on the “Create New” button. This will open up a popup as shown in the screenshot below. Provide the group name. The next section defines “People Pool”, various criteria can be used to filter users and create a Pool. These criteria/Selections are called Dynamic filters and can include: City, Country, Department, Username, Position, Job Classification, and more.
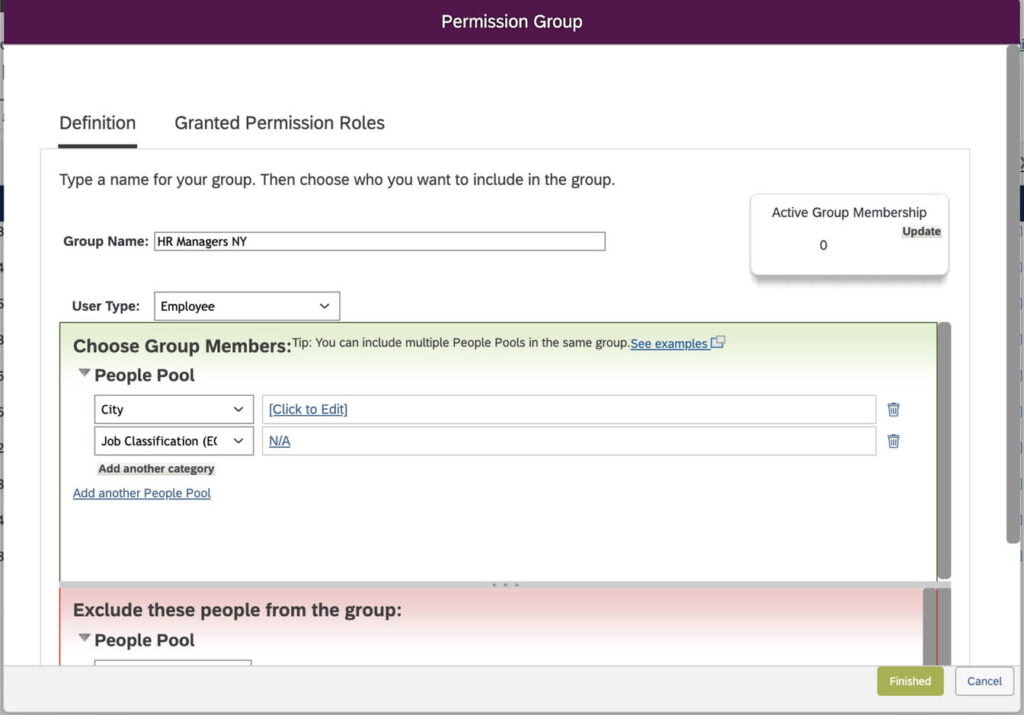
For our example, We need to create a group for HR Managers in New York City. So first we will provide the group name as “HR Managers NY” and then in the People pool, create a new pool, we have to select 2 dynamic filters. City: with value as New York AND Job Classification with value as HR Manager.
The system will check the Employee records and users that satisfy the filter conditions will become a group member(dynamically). Save. We will use this group to grant access to HRs. There is no need to update this group in the future if a new HR is hired, terminated, or transferred to another location. The system will update the group automatically. Terminated employees will always be removed from the group.
We also need to create another Permission Group which will have all employees working at New York as members. This group will be used as a target population in our example. We can create another permission group named “All Employees NY” following similar steps as above. We have to change the dynamic filters to something like this. City: New York AND Job Classification: Employee
Create Permission Roles
To create a Permission Role, We need to go to the Manage Permission Roles page. Simply search for “Manage Permission Roles” in the search bar or navigate to Admin Centre>Tools>All and search for “Manage Permission Roles”. The Page looks like the below screenshot.

Click on the “Create New” button. This will open a new page as shown in the screenshot below. Provide the Role Name and Description in the 1st Section.
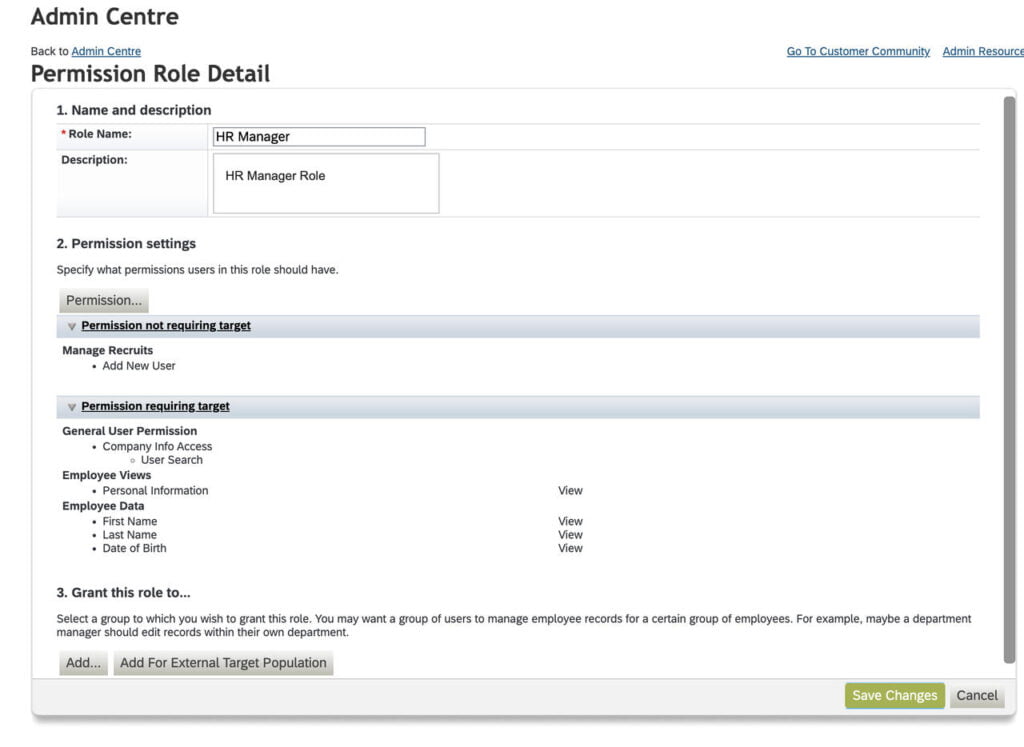
In the Permission Settings section, You can click on the “Permission…” button to select permissions. A popup window is displayed with permission categories on the left & permissions on the right. For our HR Manager role, We will select Below permissions:
- Employee Data
- First Name – View, Edit
- Last Name – View, Edit
- Date of Birth – View, Edit
- Employee Views
- Personal Information
- Manage Recruits
- Add New User
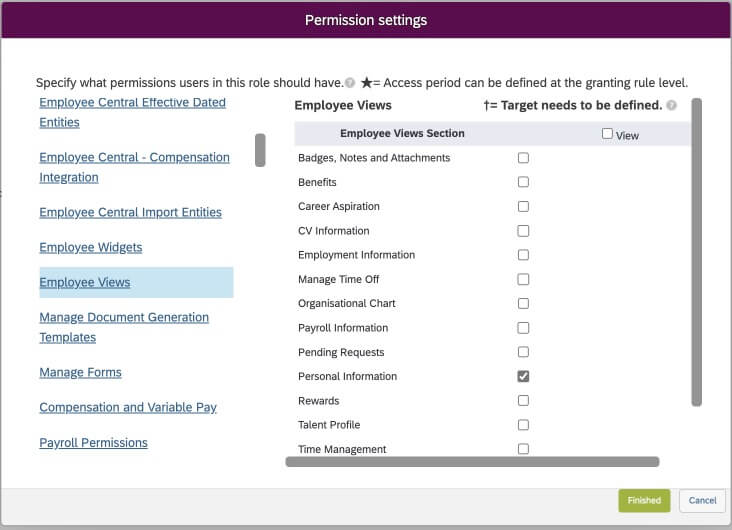
Once these permissions are selected click on Finished to transfer the selected permissions to the Permission Role Details page. You may save changes to the role at this point or continue on the 3rd section “Grant this Role to..”
Assign Permission Groups to Roles
The last step in the RBP setup is the assignment of the Role of the Users(via groups). The assignment is done by using the same screen as that of Role creation i.e. “Manage Permission Roles”. Open an existing Role definition and scroll to the bottom, You will find a section “3. Grant this Role to..” as shown in the below screenshot.

To grant the role click on the Add button. This will open a popup window as shown in the below screenshot. In this window, we have different sections.
Section 1: We can define in this section the granted population. For our example, The granted population is the HR Admins in New York City. So, we will select the permission group “HR Managers NY” that we created in 1st step as a granted population. There are a few other SuccessFactors standard options also available here to select from the drop-down in section 1., such as Managers, Matrix Managers, etc.
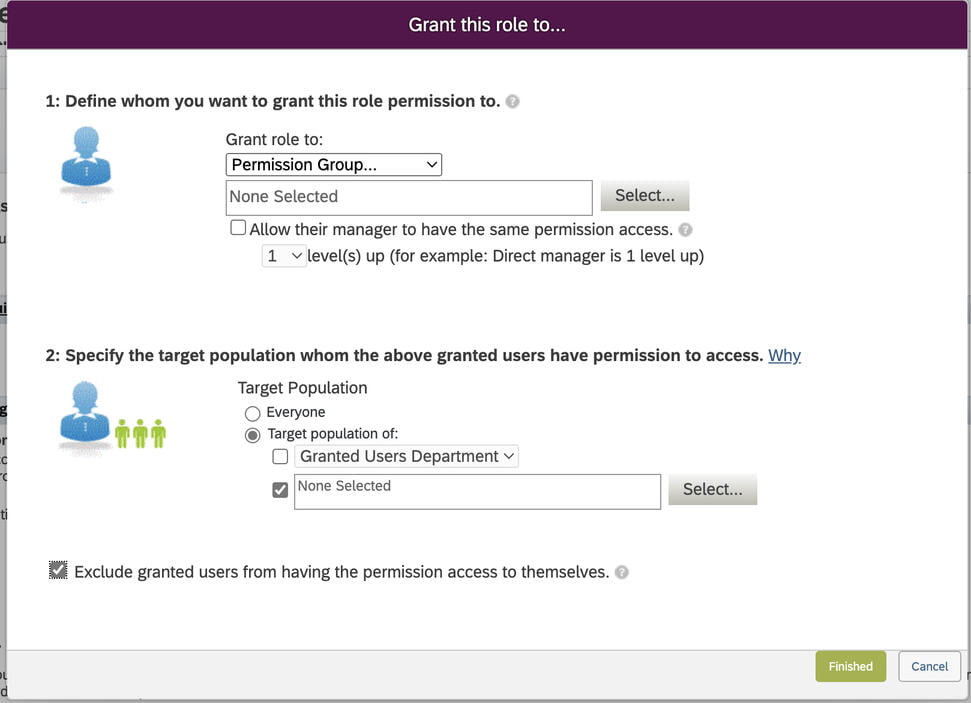
Section 2: We can define in this section the target population or users to which access is provided. For our example, The Target population is Employees in New York City. So, we will select the permission group “All Employees NY” that we created in 1st step as a target population. Similar to section 1, a few other SuccessFactors standard options are also available for section 2 as well. such as Everyone, Direct Reports, Granted Users Department, etc. but we are not going to use this for our example.
There is also a tickbox for excluding granted users from having the permissions access to themselves. This is very useful and must be selected if you do not want the HR admins to edit/update their own data. Once done you can save this and it should look like the below screenshot.

The important thing to note here is you can add more than one granted/Target entry for the same role. For example, the HR Role we built for New York can be used for other Locations. We just need to create new permission groups to define granting and target populations and then add an entry in the existing Role’s Granted section.
Conclusion
RBP framework in SuccessFactors has the potential to set up Robust and Dynamic Application Security for clients. There are many interesting features like the Dynamic filters to group users in permission groups based on the (EC)HR master data. A Role Definition can be reused between departments and locations. All of this makes the efforts involved in maintaining RBPs to a minimum and makes the security across the organization coherent.


